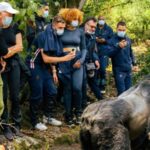
Gorilla Trekking Photography Tips and Rules
Gorilla trekking photography tips and rules are worth understanding before heading into the forest for a close encounter with mountain gorillas. Whether you are using a professional camera or simply taking pictures with your phone, a little preparation can help you capture beautiful memories without disturbing these endangered animals.
Gorilla trekking in Uganda and Rwanda offers rare opportunities to photograph mountain gorillas in their natural habitat. You might capture a silverback resting beneath the trees, a mother caring for her infant or young gorillas playing around their family. However, taking good photographs in the forest requires patience, respect and an understanding of the rules that protect both visitors and gorillas.
At Go To Africa Safari, we encourage travelers to prepare their photography equipment before the trek and remember that the welfare of the gorillas always comes first. Here is how to get the most out of your gorilla trekking photography experience.
1. Choose the Right Camera for Gorilla Trekking
You do not need the most expensive camera to take memorable gorilla photographs. The best equipment is something you can carry comfortably through a forest that may involve steep slopes, muddy trails and thick vegetation.
A DSLR or mirrorless camera offers flexibility, particularly if you want to photograph gorillas in low light. A telephoto zoom lens is useful because it allows you to frame close-ups without moving towards the animals.
A lens in the 70–200 mm or 100–400 mm range can be helpful, depending on your camera and shooting style. However, you should follow your guide’s instructions about distance rather than approaching a gorilla to improve your composition.
If you prefer using a smartphone, modern phones can also produce excellent photographs in good lighting. Clean your lens before the trek, familiarise yourself with the camera controls and avoid relying too heavily on digital zoom, which can reduce image quality.
Whatever equipment you choose, keep it simple enough to manage while walking through the forest.
2. Prepare for Low Light in the Forest
One of the biggest challenges of gorilla trekking photography is the lighting. Mountain gorillas live in forest environments where thick vegetation blocks much of the sunlight. Even on a bright day, the forest floor can be surprisingly dark.
To improve your results, consider the following tips:
- Use a wide aperture, such as f/2.8 or f/4, when your lens allows it.
- Increase your ISO when the light is poor rather than accepting blurry photographs.
- Use a sufficiently fast shutter speed to freeze movement, especially when gorillas are feeding or playing.
- Enable image stabilisation if your lens or camera supports it.
- Check your exposure settings before reaching the gorilla family.
Aperture, shutter speed and ISO work together. You may need to adjust them throughout the encounter as the gorillas move between open patches of vegetation and darker areas beneath the trees.
Avoid becoming so focused on your camera settings that you miss the experience itself. Take a few photographs, check your results when appropriate and spend time observing the animals.
3. Bring the Right Photography Accessories
The forest environment can be wet, muddy and humid, so protecting your equipment is just as important as choosing the right camera.
Pack a waterproof camera cover or rain sleeve, even if you are trekking during the drier months. A small dry bag can help protect your camera and spare batteries when the weather changes.
Other useful items include:
- Extra batteries, as cool or damp conditions and frequent shooting can affect battery performance.
- Spare memory cards with enough space for photographs and videos where permitted.
- A microfibre cloth for cleaning moisture from your lens.
- A comfortable camera strap or harness to keep your equipment secure.
- A lightweight daypack that leaves your hands free when walking.
A tripod is usually unnecessary for gorilla trekking because you may need to move through dense vegetation and respond quickly to changing situations. A monopod may also be impractical in tight spaces, so consider your guide’s instructions and the terrain before carrying additional equipment.
4. Understand the Rules for Gorilla Trekking Photography
Good photography should never come at the expense of wildlife safety. Gorilla trekking regulations are designed to reduce stress, limit disease transmission and protect visitors and gorillas.
Rules can differ slightly between Uganda and Rwanda, so always listen carefully to the briefing given by park staff and your guide.
Maintain the Required Distance
Visitors are generally instructed to maintain a minimum distance of about 10 metres (approximately 33 feet) from mountain gorillas, subject to the current park rules and any specific guidance from rangers.
Gorillas may sometimes move closer to visitors. If this happens, do not move towards them, reach out or attempt to reposition yourself for a better photograph. Follow your guide’s instructions and allow the animals to move naturally.
A longer lens helps you take detailed photographs without getting closer than permitted.
Never Use Flash Photography
Flash photography is not allowed during mountain gorilla encounters. Sudden bursts of light can disturb the animals and interfere with a calm encounter.
Before entering the forest, disable your camera’s flash and check that automatic flash settings are turned off. If you use a phone, make sure the flash will not activate automatically in dark conditions.
Natural light may be limited, but increasing your ISO and using a wider aperture can help you capture photographs without flash.
Keep Your Movements Calm and Quiet
Sudden movements, loud conversations and attempts to attract a gorilla’s attention can disturb the group.
Move slowly when instructed, speak quietly and avoid waving your camera around. Do not call to gorillas, imitate their sounds or make noises to encourage them to look towards you.
Some of the best photographs happen when you allow the animals to behave naturally rather than trying to create a particular pose.
Follow Rules on Phones and Video
Check the current park guidance on mobile phones, video recording and other electronic devices. Keep your phone on silent, avoid loud playback and never use a device to distract a gorilla.
If filming is allowed under the rules for your visit, follow the same distance and behaviour requirements that apply to photography. Your guide’s instructions take priority over getting a particular shot.
5. Focus on Natural Gorilla Behaviour
The most memorable gorilla photographs often tell a story rather than simply showing an animal looking at the camera.
Watch for natural moments such as a silverback resting, a young gorilla playing, a mother grooming her infant or a family feeding together. These behaviors offer a more meaningful record of the encounter.
Try different compositions where the situation allows:
Portraits: Focus on the gorilla’s face and eyes, using the surrounding foliage as a natural background.
Environmental photographs: Include trees, vines and vegetation to show the gorilla’s forest habitat.
Family interactions: Capture natural relationships and social behavior without moving closer or trying to influence what happens.
Details: Look for hands holding vegetation, facial expressions or the texture of the gorilla’s fur.
Remember that gorillas do not need to look directly at your camera for a photograph to be powerful. A natural moment can tell a more interesting story than a posed-looking image.
6. Make the Most of Your Limited Time
Gorilla trekking visits generally allow a limited period with the gorilla family, commonly around one hour for standard trekking experiences. The exact rules and any exceptions depend on the destination and type of experience.
That time can pass quickly, particularly when you are adjusting camera settings, changing lenses or trying to find a clear view through the vegetation.
Prepare before reaching the gorillas. Set your camera to a suitable shooting mode, check your battery and memory card, and make sure your flash is disabled.
When the encounter begins, take a few photographs early so you have some memories even if the gorillas move into thicker vegetation later. After that, observe their behavior and take additional photographs when suitable opportunities arise.
Avoid spending the entire encounter looking through a viewfinder. Put your camera down occasionally and appreciate the rare experience of seeing mountain gorillas in the wild.
7. What to Wear and Carry for a Photography Trek
Your clothing and personal preparation can make photography much easier. Gorilla trekking routes may include muddy ground, slippery slopes, thorny plants and wet vegetation.
Wear sturdy hiking boots with good grip, long trousers and a long-sleeved shirt. Gardening-style gloves can be useful when moving through vegetation, provided you follow your guide’s instructions about where and how to place your hands.
A lightweight waterproof jacket is a good idea because rain can arrive unexpectedly. Carry drinking water and any personal essentials recommended by your tour operator.
Keep camera equipment accessible but secure. You do not want to spend valuable time searching through a large bag while the gorillas are nearby.
If you hire a porter, they can help carry your bag and equipment over difficult terrain. This may leave you better able to walk safely and handle your camera when opportunities arise.
8. Respect Gorilla Health and Conservation
Mountain gorillas are vulnerable to some human respiratory illnesses and other infections. Responsible tourism therefore involves more than maintaining a suitable distance for photographs.
Follow all health instructions provided by park staff. Do not trek when you are unwell, particularly if you have symptoms of a respiratory infection. Observe the rules about coughing, sneezing and other behavior around the gorillas, and never touch them.
Do not leave rubbish in the forest, and avoid handling vegetation or objects near the gorillas unnecessarily. These precautions help protect the animals and preserve their habitat for future generations.
If a gorilla approaches you, stay calm and follow the guide’s instructions rather than trying to take a close-up photograph. No image is worth putting the animals or visitors at risk.
9. Should You Hire a Professional Wildlife Photographer?
You do not need a professional photographer to enjoy gorilla trekking. However, travelers who want to improve their wildlife photography may benefit from learning basic camera settings before the trip or asking their tour operator for advice about suitable equipment.
A professional photographer can help with composition, exposure and camera preparation, but they must still follow all park rules and instructions. Hiring someone does not grant permission to approach the gorillas, extend the encounter or use flash.
If photography is a major reason for your safari, tell your tour operator before booking. They can help you choose an itinerary that gives you time to prepare and select accommodation and transport that suit your plans.
Final Thoughts on Gorilla Trekking Photography Tips and Rules
Gorilla trekking photography tips and rules are ultimately about finding the right balance between capturing memories and respecting wildlife. A suitable camera, good preparation and an understanding of forest lighting can improve your photographs, but patience and responsible behavior matter even more.
Whether you are using a smartphone or a professional camera, keep your flash off, maintain the required distance, follow your guide’s instructions and allow the gorillas to behave naturally. The goal is not simply to take a beautiful picture but to experience these remarkable animals without disturbing them.